Posts

Assignment 2: 1:1 Fuel Tank

Image
Assignment 2 - 1:1 Fuel Tank Introduction The aim of this assignment was to create an aluminum skin that would cover a motorcycle fuel tank. Within a group of ten, we had to digitally model the decided tank and create a laser-cut model to use as a guide for creating the skin. The brief was to split the tank into three sections and have them match up to form a full aluminum skin at the end. YAMAHA IT 250 Fuel Tank Modelling the Tank The first step in modelling the tank was to convert the physical form into a digital model. To achieve this we used Autodesk; recap, and a function within it called Photogrammetry. This works by taking many photos of many different angles of the object, and then stitching them together to create a digital form. My first attempt at doing this wasn't successful, and one side was extruded in a weird way. Russell suggested that we take more photos and use tape on the tank,to make it easier for photogrammetry to stitch it togeth...
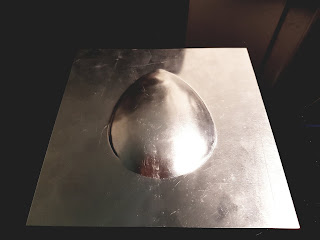
The Blister

Image
The Blister The blister was made by sandwiching the metal between CNC-cut templates, bolting them all together and then hammering out the template shape to create this blister-like form. In order to form a distinct shape i had to make a corking tool and sand it down to get a shape that would fit the edge nicely, so i could hammer it out.

The Tray

Image
The Tray To create the tray, a rectangle of aluminum was sandwiched between two wooden templates in a vice, leaving a 1 cm overlap of the template. This was then hammered into shape around the template. The sides were fairly straight forward, however i found creating the trays corners fairly challenging and had to continuously remove the tray from the template to hammer out potential folds and remove excess material as the corners stretched upward, shrinking into shape.   

The Torus

Image
The Torus The torus, otherwise known as a reverse curve is created when a form curves in two opposite directions, similar to the form of the inside of a doughnut.  To create this form i used a stump and a nylon mallet, holding the metal bent around the stump and gently and gradually hammering the reverse curve into shape.

The Bowl

Image
The Bowl My bowl was made by first cutting a circle from the provided metal with tin-snips. By tracing the provided template of concentric circles, and using the lines as guides, I formed the bowl shape using a nylon-hammer, initially with a stump and then using a sandbag. My bowl has a radius of 275mm. Using the large english wheel i smoothed out the dents and finished it by sanding out any scratches and polishing it.